Most POD sellers get their first design rejected or printed blurry for one reason: wrong t-shirt design dimensions. Not bad art. Not weak niches. Just the wrong pixel count or DPI setting.
We have seen sellers waste entire weekends re-exporting files because they used 72 DPI (web resolution) instead of 300 DPI (print resolution). That is a fixable problem, and this guide fixes it permanently.
What Are T-Shirt Design Dimensions?
Every POD platform publishes specific upload requirements. Get them wrong and your design either gets rejected at upload, prints blurry, or renders at the wrong scale on the shirt. The good news: once you memorize a handful of numbers, you never think about this again.
The baseline you need to remember: 4500 x 5400 pixels at 300 DPI. That covers the vast majority of full front t-shirt prints across platforms.
Platform-by-Platform T-Shirt Design Dimensions
Not every platform uses the same specs. Here is exactly what you need for each major POD marketplace.
Amazon Merch on Demand
Amazon Merch is the most strict about t-shirt design dimensions:
- Standard t-shirt: 4500 x 5400 px at 300 DPI
- File format: PNG only (transparent background required)
- Max file size: 25 MB
- Color mode: sRGB
Amazon does not accept JPEG, SVG, or any format besides PNG. The 4500 x 5400 pixel requirement is non-negotiable. Upload anything else and you get an instant rejection.
Printify
Printify is more flexible but still has recommended dimensions:
- Full front: 4500 x 5400 px at 300 DPI (recommended)
- Left chest: 1500 x 1500 px at 300 DPI
- Back print: 4500 x 5400 px at 300 DPI
- File formats: PNG, JPG, SVG
- Max file size: 100 MB (PNG/JPG), 20 MB (SVG)
- Max resolution: 30000 x 30000 px
Printify accepts larger files than most platforms, so there is no reason to compress your artwork before uploading. Always use the highest quality export your design tool supports.
Printful
Printful has slightly different requirements depending on the print technique:
- DTG (Direct to Garment): 4500 x 5400 px at 300 DPI
- All-over print: 6000 x 7200 px at 150 DPI minimum
- Embroidery: Vector file (SVG, AI, or EPS) preferred
- File formats: PNG (recommended), JPG, SVG
- Max file size: 200 MB
For Printful's all-over print products, the dimensions jump significantly because the design wraps around the entire garment. Plan your canvas size accordingly.
Redbubble
- Standard t-shirt: 2400 x 3200 px minimum
- Recommended: 4500 x 5400 px at 300 DPI
- File formats: PNG, JPG, GIF
- Max file size: 300 MB
- Transparent backgrounds: supported and recommended
Redbubble technically allows lower resolution uploads, but designs under 3000 px wide look noticeably worse in print. Always upload at 4500 x 5400 even if the minimum is lower.
TeePublic and Other Marketplaces
- TeePublic: 5000 x 5500 px at 300 DPI (PNG recommended)
- Spreadshirt: 4000 x 4000 px at 200 DPI minimum
- Zazzle: 3600 x 4200 px at 150 DPI minimum
Want to do this yourself? Merch Titans automates the entire process.
Print Area Dimensions by Placement
Where you place a design on the shirt matters as much as the overall file size. A full front print and a left chest logo need completely different dimensions.
Full Front Print
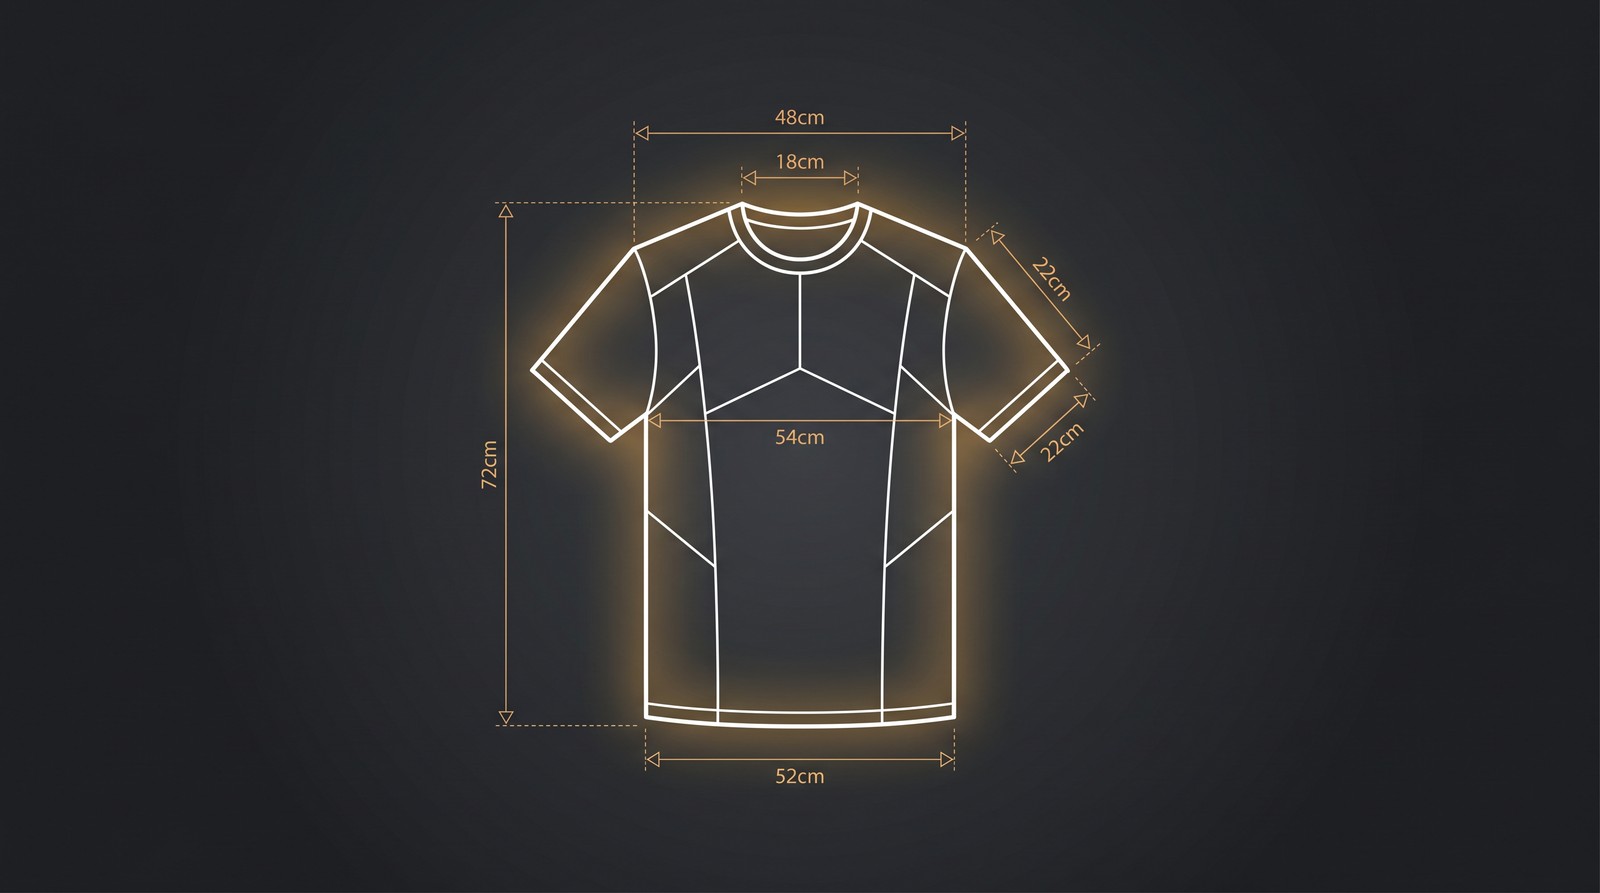
The full front is the most common placement for POD designs:
- Standard adult: 12 x 16 inches (3600 x 4800 px at 300 DPI)
- Ladies fit: 10 x 13 inches (3000 x 3900 px at 300 DPI)
- Youth: 9 x 11 inches (2700 x 3300 px at 300 DPI)
- Placement: 2-3 inches below collar, centered
Upload your design at the maximum platform size (4500 x 5400 px) regardless of placement. The platform scales down automatically. Scaling up from a smaller file destroys quality.
Left Chest / Pocket Print
- Standard area: 3 x 3 inches to 5 x 5 inches
- Pixel dimensions: 900 x 900 to 1500 x 1500 px at 300 DPI
- Placement: 4-6 inches below collar, wearer's left side
Left chest designs are perfect for logos, badges, and minimal graphics. Keep the design simple because fine details get lost at this scale.
Full Back Print
- Standard adult: 12 x 13 inches (3600 x 3900 px at 300 DPI)
- Placement: 4-5 inches below collar seam
Back prints pair well with a small left chest logo on the front. Many top sellers use this combination for brand-style designs.
Sleeve Print
- Short sleeve: 3.5 x 3.5 inches (1050 x 1050 px at 300 DPI)
- Long sleeve: 3 x 14 inches (900 x 4200 px at 300 DPI)
Sleeve prints are underused in POD because most sellers forget they exist. That is an opportunity. Simple sleeve logos and vertical text can differentiate your listings.
DPI and Resolution: Why 300 DPI Is Non-Negotiable
DPI (dots per inch) controls how many pixels map to each physical inch of printed fabric. 300 DPI is the print industry standard, and dropping below it creates visible pixelation.
Here is what happens at different DPI levels:
| DPI | Quality | Use Case |
|---|---|---|
| 72 | Screen only | Web images, social media |
| 150 | Minimum printable | Budget prints, large format |
| 300 | Professional standard | All POD platforms |
| 600 | Overkill | Unnecessary for t-shirts |
A design at 72 DPI that looks crisp on your monitor will print blurry on a shirt. This is the single most common mistake new POD sellers make.
How to Check and Set DPI
- Open your design file in your editing software
- Go to Image > Canvas Size or Document Properties
- Set resolution to 300 pixels per inch
- Set dimensions to 4500 x 5400 pixels (for full front)
- Export as PNG with transparent background
In Canva, set your custom canvas to 15 x 18 inches at 300 DPI (which equals 4500 x 5400 pixels). In Photoshop, create a new document at 4500 x 5400 px with 300 PPI resolution.
Speed Up Your Design-to-Upload Workflow
Merch Titans automates keyword research, listing creation, and bulk uploads so you spend less time on admin and more time designing.
Get Started Today →14-day money-back guarantee · Used by 150,000+ sellers since 2018
File Formats: PNG vs. JPG vs. SVG
PNG with a transparent background is the correct choice for 95% of POD uploads. Here is why:
- PNG: Lossless compression, supports transparency, sharp edges on text and graphics. Universally accepted across all POD platforms.
- JPG/JPEG: Lossy compression introduces artifacts around text and sharp edges. No transparency support. Only use when a platform requires it or file size is a hard constraint.
- SVG: Vector format that scales infinitely without quality loss. Ideal for logos and text-only designs but not supported by all platforms.
Transparency Matters
Most POD t-shirt prints use DTG (direct to garment) printing. If your PNG has a white background instead of transparent, that white area prints as a visible white rectangle on the shirt. Always export with a transparent background unless you intentionally want a background color.
Setting Up Your Canvas in Popular Design Tools
Adobe Photoshop
- File > New
- Width: 4500 pixels, Height: 5400 pixels
- Resolution: 300 pixels/inch
- Color Mode: RGB Color, 8-bit
- Background Contents: Transparent
- Export: File > Export As > PNG
Canva
- Create Design > Custom Size
- Enter 4500 x 5400 px (Canva defaults to 96 DPI, but exports at the pixel dimensions you set)
- Design on a transparent background (Pro feature required)
- Download as PNG with transparent background checked
Adobe Illustrator
- File > New
- Width: 15 inches, Height: 18 inches
- Color Mode: RGB
- Raster Effects: 300 PPI
- Export: File > Export As > PNG (300 PPI, transparent background)
GIMP (Free)
- File > New
- Width: 4500 px, Height: 5400 px
- Advanced Options > X/Y Resolution: 300 pixels/inch
- Fill: Transparency
- Export: File > Export As > .png
The Scaling Problem: Why One Size Fits All (Sort Of)
You upload a single design file, but your t-shirt prints on sizes from Youth XS to Adult 5XL. The printable area changes dramatically across sizes.
Here is what most guides do not tell you: your design does not resize across garment sizes. The print stays the same physical dimensions. A 12-inch wide design prints at 12 inches on both a Medium and a 3XL. On the 3XL, it looks proportionally smaller compared to the shirt.
Some platforms (like Printify) let you adjust print position and scale per product, but most auto-center your design at a fixed size.
Best Practice for Multi-Size Prints
- Keep critical elements inside the center 70% of your canvas. Edge details may get clipped on smaller sizes.
- Avoid fine text under 14pt. It becomes unreadable on youth sizes.
- Use the platform's mockup generator to preview how your design looks on XS through 5XL before publishing.
Common T-Shirt Design Dimension Mistakes
We see the same errors repeatedly from sellers who are otherwise great designers:
- Using 72 DPI screen resolution. Fix: Always start your canvas at 300 DPI.
- Uploading JPG with white background. Fix: Export as PNG with transparency.
- Designing at 1000 x 1000 px "to save time." Fix: Start at 4500 x 5400 and scale down if needed. Never scale up.
- Ignoring platform-specific requirements. Fix: Check your upload specs before designing, not after.
- Forgetting about color mode. Fix: Always design in sRGB color mode. CMYK files display differently on screen and some platforms reject them.
Merch Titans Automation
Upload Designs Faster Than You Create Them
Merch Titans' automation tools handle keyword research, listing optimization, and bulk uploads across platforms - so you focus on design.
14-day money-back guarantee · No contracts · Cancel anytime
Quick Reference: T-Shirt Design Dimensions Cheat Sheet
| Platform | Dimensions (px) | DPI | Format | Max Size |
|---|---|---|---|---|
| Amazon Merch | 4500 x 5400 | 300 | PNG only | 25 MB |
| Printify | 4500 x 5400 | 300 | PNG, JPG, SVG | 100 MB |
| Printful | 4500 x 5400 | 300 | PNG, JPG | 200 MB |
| Redbubble | 4500 x 5400 | 300 | PNG, JPG | 300 MB |
| TeePublic | 5000 x 5500 | 300 | PNG | N/A |
| Spreadshirt | 4000 x 4000 | 200 | PNG, JPG, SVG | 100 MB |
Bookmark this table. It covers 90%+ of POD sellers' needs. For niche platforms or specialty products (mugs, phone cases, all-over prints), check the platform's help docs for product-specific dimensions.
The sellers who scale fastest are the ones who nail their technical specs once and then never think about them again. Get your t-shirt design dimensions right from the start, build templates in your design tool, and spend your energy on what actually moves the needle: great designs in profitable niches.
Frequently Asked Questions
What size should a t-shirt design be in pixels?
The standard t-shirt design size is 4500 x 5400 pixels at 300 DPI for a full front print. Amazon Merch on Demand requires exactly 4500 x 5400 pixels, while Printify and Printful accept up to 4500 x 5400 at 300 DPI. Always check your specific platform's requirements before uploading.
What DPI should I use for t-shirt designs?
Use 300 DPI for all print-on-demand t-shirt designs. This resolution ensures crisp, professional prints at any standard print size. Some platforms accept 150 DPI as a minimum, but 300 DPI is the industry standard that prevents pixelation and blurry output.
What is the print area for a standard t-shirt?
A standard adult t-shirt full front print area measures approximately 12 x 16 inches (3600 x 4800 pixels at 300 DPI). The actual printable area varies by garment size, with youth sizes typically offering 9 x 11 inches and ladies' cuts around 10 x 13 inches.
What file format is best for t-shirt designs?
PNG with a transparent background is the best file format for t-shirt designs on POD platforms. PNG preserves sharp edges, supports transparency, and maintains color accuracy. Most platforms also accept JPEG and SVG, but PNG is universally preferred for print-on-demand uploads.
Do I need different design sizes for different t-shirt sizes?
You upload one design file per listing, and the POD platform scales it automatically across garment sizes. However, the print area shrinks on smaller sizes like Youth S, so designs with fine details or small text may become unreadable. Test your design on the smallest available size before publishing.